 |
| New signs for the garden compliments of the Western Upper Peninsula Health Department. |

Our Garden Is Smoke-Free
RSCG Makes International Headlines (well, almost)...
 |
| Leena Vanni striking a pose in front of our new garden shed. |
Waiting for Water...
 |
| (From left) Joe, Bob, and Ken of the Hancock Department of Public Works. |
Ideally, the water system is something you want to have in place before you plant the garden, but things don't always work out as planned. Thankfully it's been a relatively wet (and late) Spring and our mulched beds are holding moisture nicely. Part of the City of Hancock's commitment to the community garden project is to provide water to the garden at no charge. Shown above are some of the good folks from the Department of Public Works hooking up a supply line for the garden off the existing water hydrant. Our sustainable water use strategy at the garden is to first conserve water, then to collect and use rainwater from on-site sources, and as a last option use the City supplied well water.
Asparagus - Our first perennial planted!

Although we weren't quite ready to plant asparagus this year, we couldn't resist the temptation when we were offered 45 asparagus crowns free, a surplus from this year's Conservation District Spring Tree Sale (thank you!). Here we are placing crowns in a prepared trench which will be incrementally filled with soil throughout the Spring as the first spears grow. We were pleasantly surprised to find such deep, rich-looking soil in the area we designated for our perennial garden.
First Garden Season Opens!
It's May 7th and it feels like it might (finally) be Spring. Today was garden orientation when our gardeners are turned loose to take over the garden for its first season. Here we are discussing our compost system and the importance of cycling nutrients to maintain soil fertility.


Viki and Leena plant mustard and cress, the first seeds sown of the season. Thanks to the Keweenaw Co-op for donating the seeds. The straw mulch is used to retain moisture in the soil, discourage growth of unwanted plants ("weeds"), moderate soil temperature, create habitat for earthworms, and provide organic matter for the soil.
The Crowning Glory of the Garden — Our Garden Shed
"Shed" is hardly the right word for this regal timber-frame structure by Mark Salo of Salo Contracting. It's truly a celebration of wood!
Mark, an experienced forester and timber-frame builder, generously donated his time to custom design and build us a structure to store our garden tools and supplies. Of course, we didn't want just any old shed...we wanted our shed to be made from local materials and to have integrity and character. We came to the right man! Check out the beautiful forked cherry post on the front right corner.

Timber framing is the most sophisticated form of post and beam construction, one of the oldest building methods in known history. Notice the beautiful and meticulously crafted joints (no nails folks!).

Always on the lookout for used/reusable materials, we were able to salvage this metal roofing from the waste-stream of another project and give it a second life. (Thanks Keren and Joe!)


To learn more about Salo Contracting's timber-frame services contact Mark Salo at (906)281-5661 or salocontracting[at]yahoo.com. Make sure and let Mark know you saw him here. Thank You Mark!!!
 |
| Mark Salo (on roof) and his crew (from left) John Crooks and Mark Hill |
Mark, an experienced forester and timber-frame builder, generously donated his time to custom design and build us a structure to store our garden tools and supplies. Of course, we didn't want just any old shed...we wanted our shed to be made from local materials and to have integrity and character. We came to the right man! Check out the beautiful forked cherry post on the front right corner.
Always on the lookout for used/reusable materials, we were able to salvage this metal roofing from the waste-stream of another project and give it a second life. (Thanks Keren and Joe!)
Our gardeners checking out the finished shed...
To learn more about Salo Contracting's timber-frame services contact Mark Salo at (906)281-5661 or salocontracting[at]yahoo.com. Make sure and let Mark know you saw him here. Thank You Mark!!!
Weed Block & Woodchips
We want paths that are durable (for high-traffic), low-maintenance, water permeable, and economical. Always looking for locally available materials, we decided to go with woodchips, a resource that is available in plenty each spring as a byproduct of the tree pruning the local power company performs around the power lines. Big thanks to UPPCO and Asplundh for the primo chips and the free delivery.

After some belly-aching about using a petroleum-based product, we decided to go with a commercial-grade weed barrier made from recycled plastic bottles. It took some searching online to find one made from recycled materials but we did and we were able to order it through our local hardware store (Risto's Hardware) for cheaper than we could buy it online.

Being careful to lay the weed barrier with adequate overlap at the seams and around the edges we secured it in place using landscaping staples. Then the woodchips are piled on, and on, and on in a 4-6 inch layer.
Spring has Sprung!

It's April 8th and we're back at it! There's lots to do before our first growing season. Notice our newest and cutest addition in the foreground—the little circle bed. Our dedicated garden crew in the background work to top-off the raised beds with what's left of the compost pile.

Thanks to Susan Fawcett of Earthwork Music who stopped by and helped us get our sluggish gardening muscles back in tune.
Winter Slumber
 |
| The garden beds all tucked in under a fresh blanket of snow. |
Raised Beds (the big decision)
Deciding whether or not to build raised beds and how to build them required more discussion and research than we anticipated. Longevity, ecological impact, cost, whether or not the materials were produced locally, whether or not they could be disassembled and reused, aesthetics, ease of installation...these are just some of the criteria we considered. Because of our site (sand and gravel fill over demolition debris) we came to the conclusion that our best option was to build the garden from the surface up.
 We choose a locally produced retaining wall product called Gardenstone from Superior Block in Houghton. Here they are delivering our block and gravel with their nifty remote control crane.

Pictured in the foreground is a grey Gardenstone block (they are available in three other colors for additional cost). The underside of the block is facing up so you see the lip along the back that interlocks one course of block to the next. Each course sets back the dimension of this lip (3/4 inch) from the course below it so your bed area slightly shrinks as you build up. The palette to the right contains the caps for the final course of the wall which will be attached with adhesive to solidify the wall.
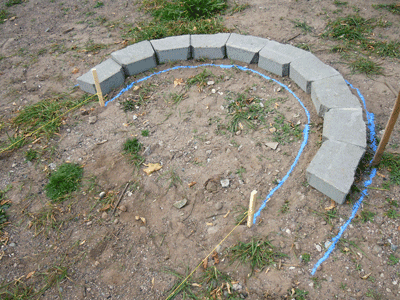 Here we are calculating the arc dimension and marking guidelines in preparation for digging the trench for the wall. In order to make an arc we had to knock off the ears on the back of each block. We discovered the tightest diameter circle the block can make without cutting is 6-feet, slightly over the maximum width you want to make a raised bed and still be able to comfortably reach the middle (5-feet is recommended). The final height of our beds will be about 16-inches, but Gardenstone is approved for wall heights up to 20-inches.


Pictured in the foreground is a grey Gardenstone block (they are available in three other colors for additional cost). The underside of the block is facing up so you see the lip along the back that interlocks one course of block to the next. Each course sets back the dimension of this lip (3/4 inch) from the course below it so your bed area slightly shrinks as you build up. The palette to the right contains the caps for the final course of the wall which will be attached with adhesive to solidify the wall.
With the beds all laid out, we brought in the muscle! The Western Upper Peninsula Health Department (WUPDHD) helped organize and sponsor a Make a Difference Day (Oct 23: the nation's largest day of service) event at the garden for a group of AmeriCorps workers. The photo above shows us digging the trench that will eventually be filled with gravel.
The blocks are set on grade (south facing slope) in the gravel trench and leveled from side to side. We used sheets of cardboard (bike boxes supplied by Downwind Sports in Houghton) as our weed barrier on the bottom of the bed.
Even more AmeriCorps workers showed up at this point and we power shoveled the compost into the bed. These folks work hard! Thank You AmeriCorps!
The day wouldn't be complete without a little celebratory hula hooping to christen the new bed. Go Keren! Go Viki!
The project continues...
Building the third raised bed took a lot more time with only 2-3 of us on task. Fortunately a Community Service Work crew stopped by for a bit (thanks to the Hancock Department of Public Works) and helped us move soil into the bed. Thanks guys!
A rockin' project!
All the stone and concrete rip-rap we've unearthed on-site will be used to build a dry stack fieldstone retaining wall between the main garden area and the upper terrace.
 Keren and Don haul and sort rock by size in preparation for building the wall.

Viki cuts a trench at the base of the berm in preparation for the foundation.

 Keren and Heather building one of the final courses of rock and filling the voids with gravel. Notice the old blue jeans used as weed barrier on the berm.


Viki cuts a trench at the base of the berm in preparation for the foundation.

Concrete rip-rap set in gravel is used as the foundation for the wall.
Moving mountains...

The foreground shows a pile of city compost as we received it, littered with biodegradable plastic yard waste collection bags—in the background is a pile that has been hand sifted. It took 17 labor hours to hand sift one pile (one dump truck load) and we removed 10 garbage bags full of plastic pieces.

Our dedicated volunteers (from left: Susan, Noah, Viki, and Sarah) hand sifting the compost and piling it so it's ready for filling the raised garden beds.
Community Service
Finlandia University UNS100 students posing on top of a pile of compost that they helped sift as part of their community service project. Thanks to the FU crew and Leroy from the City for all your help.
 |
Our garden team grows...

The tedious task of finish grading the site by hand was considerably more fun and faster with our three new volunteers and gardeners. Thanks Rachael, Ryan, and Anne!
Our first harvest!
Hancock resident, Angela Manchester, harvests choke cherries (from one of the existing trees on-site) to make jelly and cordial.


Subscribe to:
Posts (Atom)